Add and Configure Profile
DSP profiles are configurations within DSPs that specify rules for bid requests sent to DSPs. The Profiles tab provides a comprehensive view of each profile's performance metrics, such as Revenue and RPM (Revenue Per Mille). Revenue represents the total earnings generated from ad impressions, and under the Revenue column, the total revenue for all profiles is displayed. RPM, which measures the revenue earned per 1,000 sent opportunities, also has a column that displays the average RPM for the DSP (not the aggregate of its individual profiles). The tab includes graphical representations of Revenue and RPM trends for the selected time period, allowing you to analyze daily data points when hovering over the graphs.
The Profiles tab also enables users to manage their DSP profiles effectively, offering options to edit, activate/pause, delete, and select inventory. It provides a search function and filters by profile type, with active/paused and removed profiles organized in separate tabs for easy navigation.
Additional graphs offer insights into various performance aspects:
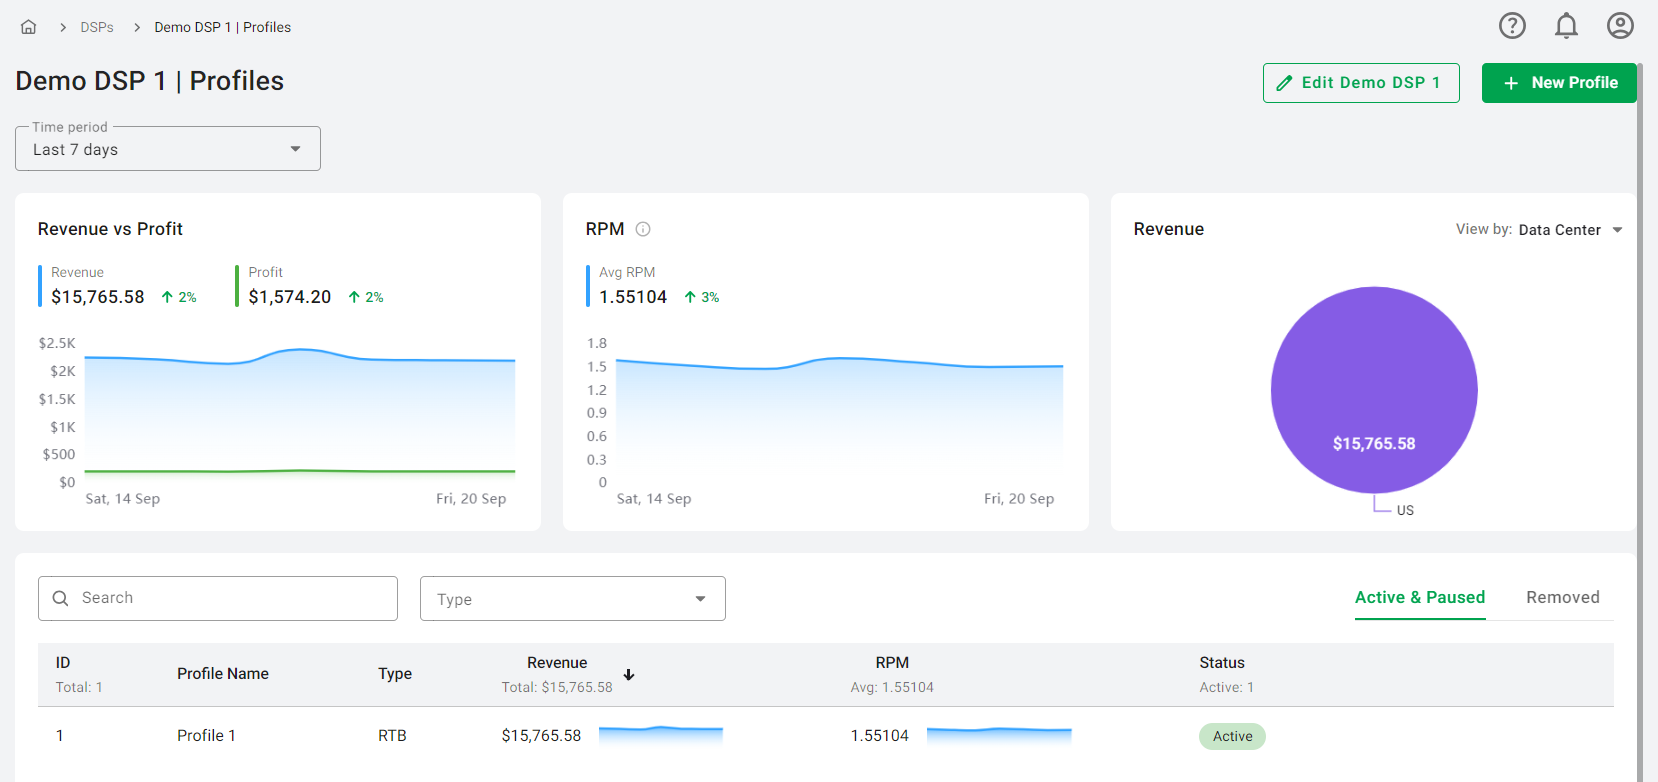
- Revenue vs Profit: This graph shows the total revenue and profit over the selected time period, with a visual comparison between the two. Next to the sum, you can see the percentage change compared to the previous period (indicated by green for an increase, red for a decrease, and nothing if there is no change). The graph uses two area charts, providing detailed daily data on hover.
- RPM (Revenue Per Mille, RPM = Revenue / Sent Opportunities * 1000): This graph displays the average RPM for the DSP, not the aggregate of its individual profiles. It reflects the average data over the selected time period and includes a percentage change indicator compared to the previous period. The graph is presented as an area chart with day-by-day data available on hover.
- Revenue by Data Center: A pie chart that allows you to view revenue distribution by connected data center, country, or ad type through a dropdown menu.
The Time Period dropdown menu allows you to select a specific time period for your data. Options include today, yesterday, the last 7 days, the last 30 days, last month, and this month. Data on the graph is split by hour for 'today' and 'yesterday', and by day for the other options, providing a comprehensive view of DSP profile performance over time.
- On the DSPs tab select the desired DSP.
- On the Profiles tab click the 'New Profile' button in the upper right corner.
- In the opened modal window, first fill in the Main Settings, then proceed to Targeting, Demand Rules and Inventory Selector.
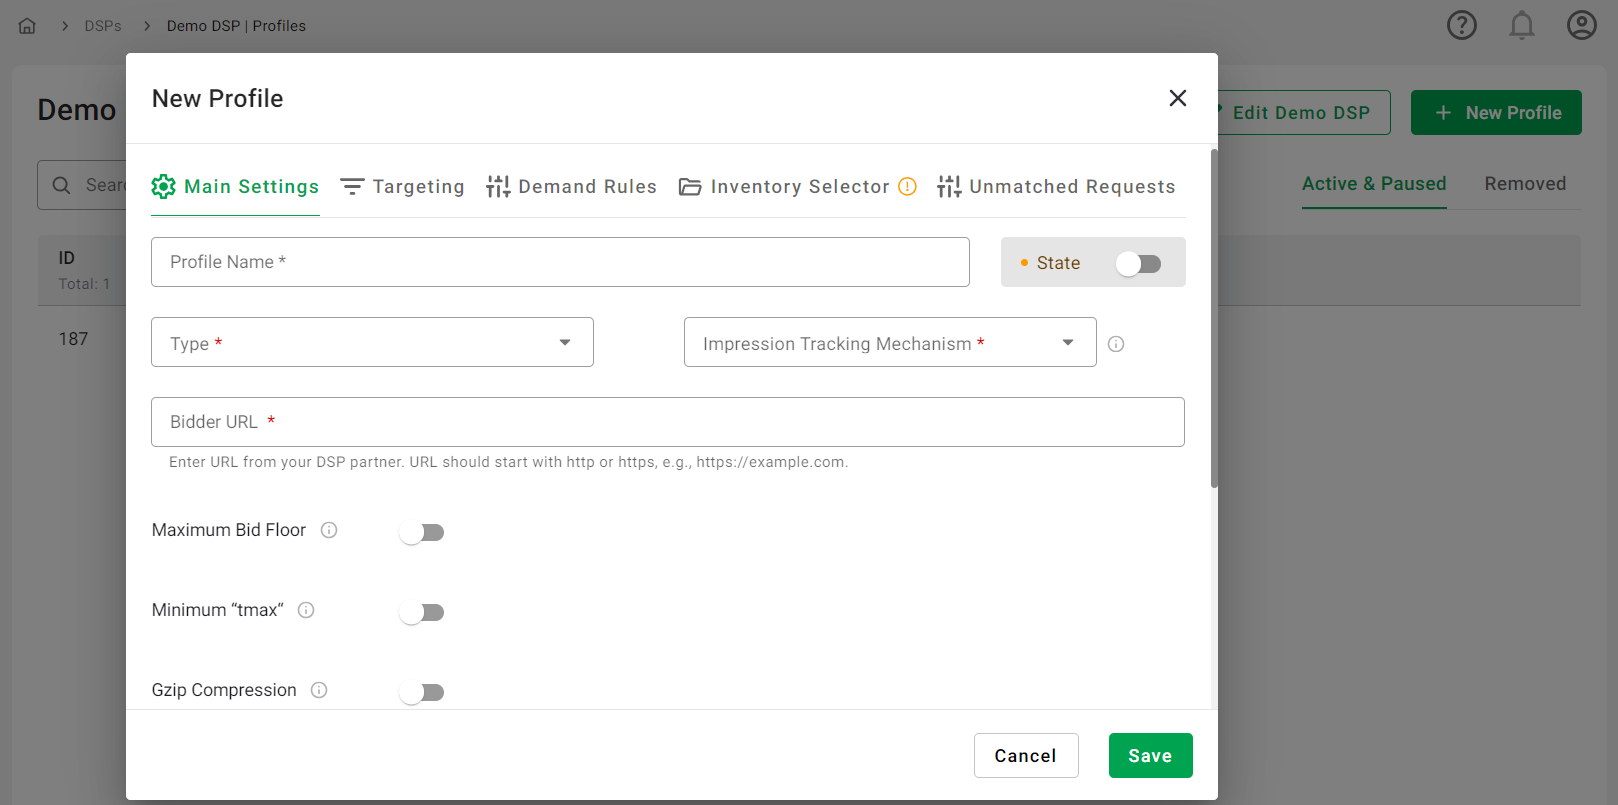
- Enter Profile Name (required).
- Type (required): RTB.
- State: Toggle between Active and Paused. When paused, the profile won't be used for bidding. The profile will inherit the DSP’s state, meaning if the DSP is paused, so is the profile.
- Select an Impression Tracking Mechanism (required). To prevent discrepancies with DSP partners, it's essential to confirm this setting with them beforehand. For a deeper understanding of how SSP and DSP trackers are implemented, you can read more about the process in our guide on SSP and DSP Trackers Implementation.
- Bidder URL (required): Enter the URL provided by your DSP partner. The URL should start with http or https (e.g., https://example.com).
- Maximum Bid Floor, in $: Toggle on to establish the maximum bid floor value for this profile. If the bid floor, including our commissions, exceeds this specified limit, the request will not be sent to the DSP and the bid will be marked as filtered out in the statistics. The maximum allowed value is $100.
- Minimum “tmax”: Toggle on to set the maximum time in milliseconds that the exchange allows for bids to be received, taking into account internet latency, to avoid a timeout. If the DSP does not respond within this set time, its bid will be disregarded. The maximum value that can be set is 3000 milliseconds (or 3 seconds).
- Gzip Compression: Toggle on to enable compression of the bid request. This feature must be agreed upon between the exchange and the bidder.
- Integration Adapter Settings: When you select an Integration Adapter in the DSP settings, additional fields may appear based on the specific adapter chosen. These additional fields can include settings such as custom identifiers, bid floor adjustments, and other DSP-specific parameters that are necessary for the integration.
- Auction Type:
- Second Price: In a second-price auction, the winner pays the second-highest bid amount plus a minimal increment above that bid (USD 0.01).
- First Price: In a first-price auction, the winner pays the amount they bid, regardless of the bids submitted by other participants.
- Spend Limit: Set a Spend Limit to control your budget by setting a maximum limit on the amount spent on profile. The limits work on an ASAP basis, meaning that they are enforced as soon as the specified conditions are met, rather than being spread over the entire indicated date range. If different limits are set on a DSP and its profile, the entity whose limit is reached first will stop. The status of the entity will then change to 'Reached Limit'. This status will automatically change back to 'Active' after the period of the limit has passed. The fields for setting these limits include:
- Limit Amount: This is an input field that accepts only integers greater than 0. If a Limit Amount is set, the selection of a Metric for Limit and a Limit Type becomes mandatory.
- Metric for Limit: Choose the metric that will be monitored. Options include Billed Impressions or Revenue (USD).
- Limit Type: Determine the period for the limit. Options include Daily, Monthly, or Total.
- QPS Limit (required): This setting controls the maximum number of requests that a DSP profile can process per second. Toggle on to activate the input field where you can specify the QPS limit for specific data centers. If you wish to set no restrictions, switch the toggle on and leave the input field empty (labeled as "Unlimited"). If a specific limit is desired, enter the required value. Ensure that at least one toggle is activated to maintain operational clarity and prevent server overload.
- Enter Profile Name (required).
- Type (required): VAST.
- State: Toggle the profile state between Active and Paused. The profile's state will automatically inherit the state of the DSP it is associated with.
- Impression Tracking Mechanism (required): It is crucial to choose an appropriate impression tracking mechanism to ensure accurate tracking and to prevent discrepancies with DSP partners. Confirm this setting with your DSP partners beforehand. For more detailed information on how SSP and DSP trackers are implemented, refer to our guide on SSP and DSP Trackers Implementation.
- VAST URL (required): Enter the URL provided by your DSP partner. This URL should include specific macros that will be replaced dynamically when the ad is served. Ensure to replace the URL’s placeholders with the macros from the supported list below.
- Supported Macros: This section provides a list of supported macros that can be used within the VAST URL. Each macro has a specific function and is described in the accompanying table. A copy button next to each macro name facilitates easy usage.
- Expand to see the table with supported macros
- Price Type: Choose between Fixed (default) and Dynamic (currently unavailable). For the Fixed option, you are required to enter the CPM (Cost Per Mille), which is the fixed price for 1000 impressions. The entered value must be a positive float and can include up to two decimal places. This setting determines the pricing model for the ad impressions.
- Auction Type: Select the auction type for the bidding process. The options are First Price (default), where the highest bidder pays the price they bid, and Second Price (currently unavailable), where the highest bidder pays one increment above the second-highest bid. This setting affects how the DSP will bid in real-time auctions.
- Spend Limit: Set a Spend Limit to control your budget by setting a maximum limit on the amount spent on profile. The limits work on an ASAP basis, meaning that they are enforced as soon as the specified conditions are met, rather than being spread over the entire indicated date range. If different limits are set on a DSP and its profile, the entity whose limit is reached first will stop. The status of the entity will then change to 'Reached Limit'. This status will automatically change back to 'Active' after the period of the limit has passed. The fields for setting these limits include:
- Limit Amount: This is an input field that accepts only integers greater than 0. If a Limit Amount is set, the selection of a Metric for Limit and a Limit Type becomes mandatory.
- Metric for Limit: Choose the metric that will be monitored. Options include Billed Impressions or Revenue (USD).
- Limit Type: Determine the period for the limit. Options include Daily, Monthly, or Total.
- QPS Limit (required): Control the rate of queries sent from available data centers to the DSP by setting a Query Per Second (QPS) limit within a profile. Toggle to enable the input field for specifying the QPS limit. Leave the field empty for no restrictions. Ensure at least one toggle is activated to maintain operational clarity across available data centers.
- Enter Profile Name (required).
- Type (required): Direct.
- State: Toggle between Active and Paused. When paused, the profile won't be used for bidding. The profile will inherit the DSP’s state, meaning if the DSP is paused, so is the profile.
- Select an Impression Tracking Mechanism (required): Ad markup Pixel (selected, disabled). Ad markup Pixel is a small, transparent image embedded in an ad for tracking impressions. For a deeper understanding of how SSP and DSP trackers are implemented, you can read more about the process in our guide on SSP and DSP Trackers Implementation.
- Price (CPM, $) (required): Enter a CPM in USD. Range: from $0.01 to $100.
- Spend Limit (required): Set a Spend Limit to control your budget by setting a maximum limit on the amount spent on profile. The limits work on an ASAP basis, meaning that they are enforced as soon as the specified conditions are met, rather than being spread over the entire indicated date range. If different limits are set on a DSP and its profile, the entity whose limit is reached first will stop. The status of the entity will then change to 'Reached Limit'. This status will automatically change back to 'Active' after the period of the limit has passed. The fields for setting these limits include:
- Limit Amount: This is an input field that accepts only integers greater than 0. If a Limit Amount is set, the selection of a Metric for Limit and a Limit Type becomes mandatory.
- Metric for Limit: Choose the metric that will be monitored. Options include Billed Impressions or Revenue (USD).
- Limit Type: Determine the period for the limit. Options include Daily, Monthly, or Total.
- Link Creative (required): Select and link only one creative to a Direct Profile. Creatives must be previously added and activated in the Creative Factory menu. If a linked creative is deleted from the Creative Factory, the associated profile will automatically switch to a Paused state. To return the profile to an Active state, you must manually select and link a new valid creative.
Add Profile
Main Settings
Certain fields are common across all profile types (e.g., Profile Name, Type, State). Additional fields will appear based on the Type selected. The VAST type of profile becomes available when the VAST module is activated in the platform settings.
RTB Type:
VAST Type:
Direct Type:
After all is set, remember to Click Save or proceed to Targeting.
Targeting
Utilizing a range of targeting, you can refine the traffic that will be sent to the specific Profile. Targeting employs various logical operations, including boolean functions and the use of blacklists or whitelists. With the latter, you have the option to upload a pre-prepared file for use across the platform.
Pre-targeting inventory allows you to avoid sending non-performing requests to your DSP partner, thereby optimizing server capacity for high-performing inventory. This often leads to higher bid rates and CPMs.
For more detailed information about each targeting and its logic, please refer to this page.
Demand Rules
In scenarios where specific demand needs to be rejected upon receipt from the specific Profile, it's necessary to set up demand rules. These rules use various logical operations, including boolean functions and the use of blacklists or whitelists. With the latter, you can upload a pre-prepared file for use across the platform.
For more detailed information about each rule and its logic, refer to this page.
Inventory Selector
Choose one or more packages to link inventory. Each package includes several endpoints organized by SSPs. You can select an entire SSP with its endpoints or individual endpoints. Utilize the blacklist or whitelist options to exclude specific SSPs/endpoints or include only the selected ones. 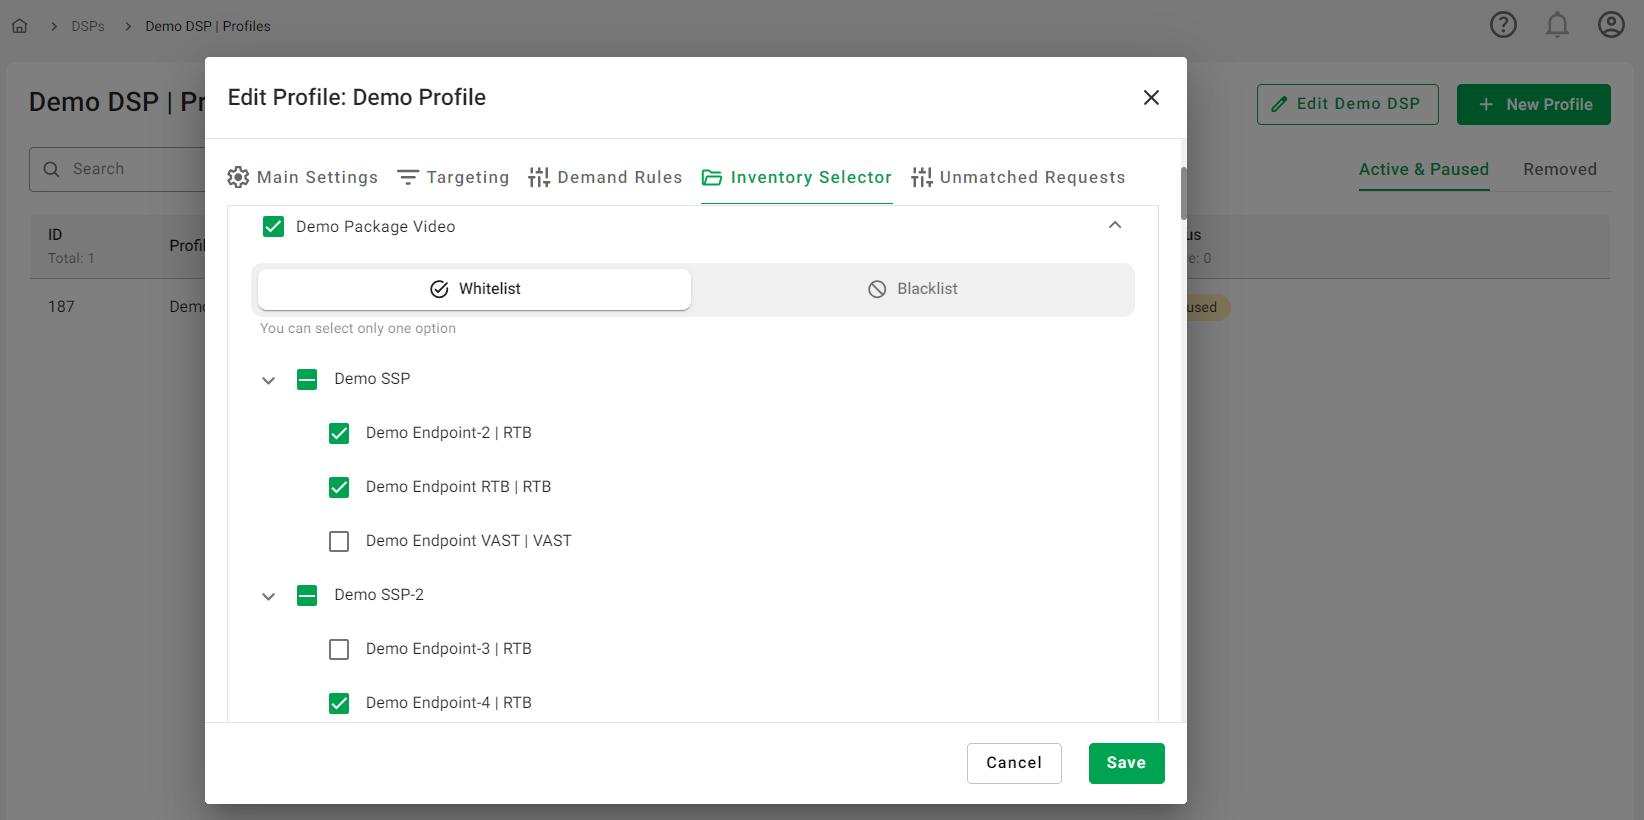
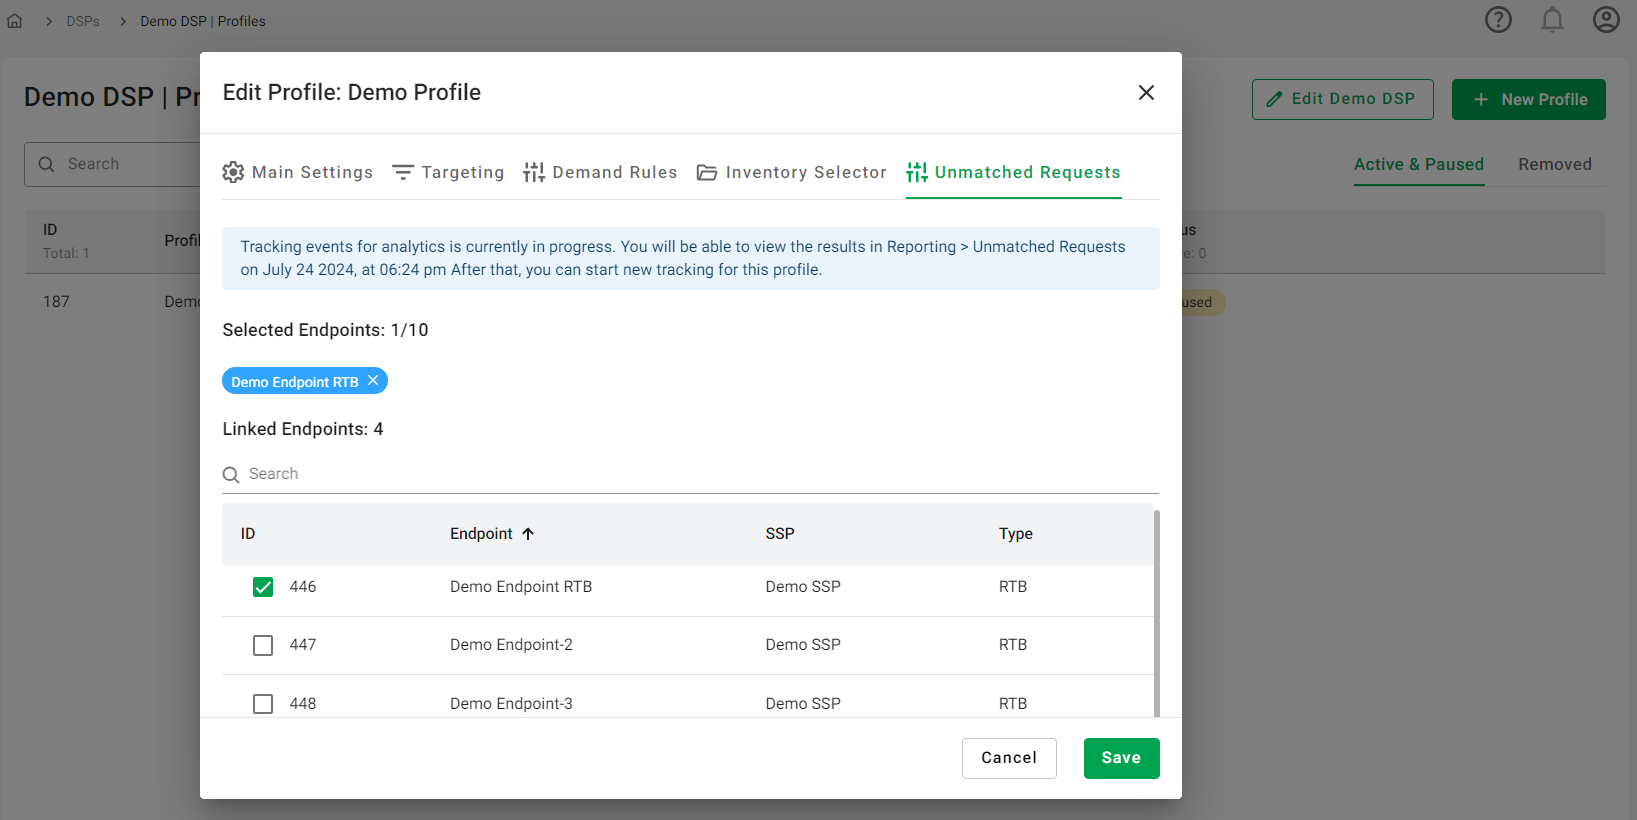
Unmatched Requests
In the Edit Profile window, you'll find the Unmatched Requests tab. This feature allows you to log and analyze unmatched requests. To initiate logging, you need to select the Endpoints for a specific Profile and then click the Save button. Once you've made your selection and saved it, we will begin tracking events for analytics.
The Unmatched Requests tab displays a Linked Endpoints table, which includes the following columns: Endpoint ID, Endpoint Name, SSP Name, and Endpoint Type. You can select up to 10 endpoints for one unmatched requests logging, which takes approximately 10 minutes to complete.
It's important to note that while you can start logging unmatched requests for several profiles simultaneously, you cannot order unmatched requests logging for the same profile while a previous logging is still in progress.
After the 10-minute logging period, you can access the results by navigating to Reporting -> Report builder tab and selecting the Unmatched Requests report type. Remember to select the date on the date picker when the logging was ordered, otherwise, the report will show 'No results'. More on Report Builder you can find here.