Request Filtration and Matching Logic
This guide provides an in-depth understanding of request filtration and matching logic in the RTB-Stack platform. It combines information on global and endpoint-level rules, demand and inventory settings, reporting, and dashboard insights to help you optimize your ad exchange workflows.
Overview of Filtration and Matching Logic
The RTB-Stack platform employs a sequential filtration and matching process to ensure optimal delivery of ads and efficient utilization of inventory. The main components of the logic include:
- Initial Bid Request Validation
- Impression opportunity (IO) Validation
- Matching Inventory with Demand
- Bid Validation
- Impression Validation
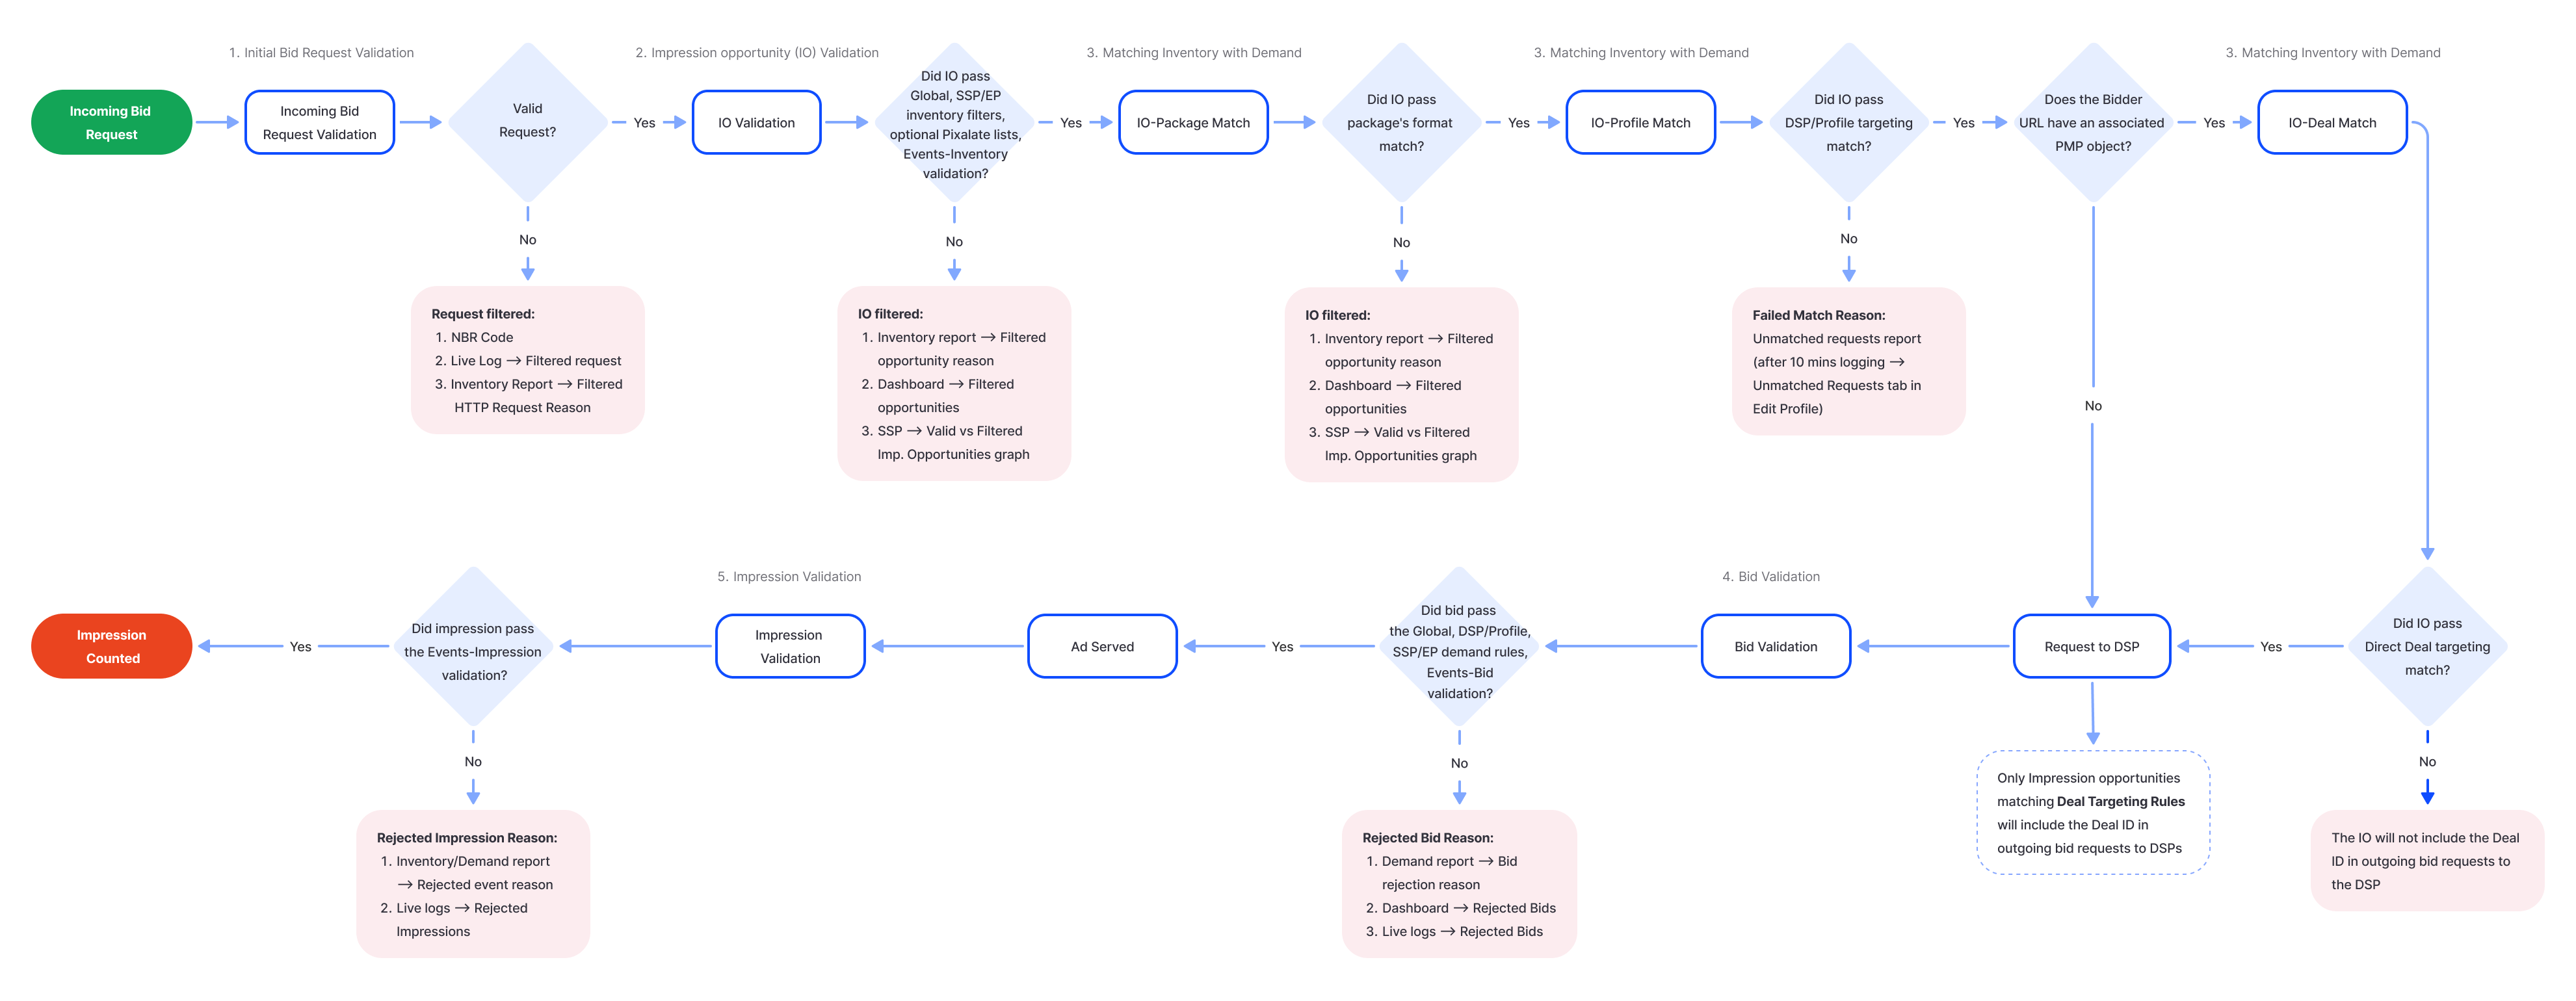
See below a flowchart of the RTB workflow in the platform, showing bid request and impression opportnity validations, inventory matching, and filtering steps. Click to enlarge for details.
- Expand to see the Legend and Key Descriptions for Flowchart
Detailed Explanation of Filtering Stages
1. Initial Bid Request Validation
Incoming bid requests are validated against predefined rules to ensure only eligible requests proceed. Validation steps include:
-
Invalid Request Handling: Requests that fail specific checks are assigned an NBR code. These codes indicate reasons for rejection, such as invalid request, missing domain or bundle parameter, or type of the request does not match the Endpoint type.
-
Traffic Filtering with Pixalate's Block Lists1: The RTB-Stack platform enhances ad traffic quality by integrating Pixalate's pre-bid blocking lists. These regularly updated lists help block suspicious or low-quality traffic, ensuring cleaner and more reliable ad inventory. The block lists include:
- Device ID Block List: Filters requests from suspicious or fraudulent devices.
- IPv4 Block List: Blocks traffic from IPs known for low-quality or fraudulent activity.
- OTT Block List: Targets and blocks unreliable OTT media service traffic.
Example Scenario: A bid request contains no "tmax" value or has an invalid one. As a result, the request fails validation, returning a 400 status code with a JSON body containing NBR=518. The user checks the NBR Codes Documentation and identifies that code 518 means "The 'tmax' value is either missing or invalid." To investigate further, the user navigates to Reporting, selects the Inventory report type, and sets the Filtered HTTP Request Reason dimension. In the generated report, the user reviews the number of Filtered HTTP Requests flagged with the "Invalid 'tmax'" reason.
Where to Analyze Filtering Reasons for Filtered Requests:
- NBR Codes Documentation
- Live Logs → Filtered request log type
- Reporting → Inventory Report → Filtered HTTP Request Reason dimension
2. Impression Opportunity Validation
This stage applies global, SSP-level, and endpoint-level filters to incoming Impression Opportunities (IOs). It ensures compliance with inventory filtering rules and bid floor requirements before matching with demand. Stage include following levels:
- Global Inventory Filters: These apply at the highest level, ensuring a streamlined configuration process. These filters precede all SSP or Endpoint rules.
- SSP-Level Filters: Applied after global rules and include standard and advanced filters.
- Endpoint-Level Filters: The final layer of filtration for incoming IOs, including endpoint-specific inventory settings.
Example Scenario: An IO from a specific device type is filtered out with the reason "Unmatched Device Type". The user can identify this issue in the Dashboard under the Filtered Opportunities graph by selecting View by: Reason (Unmatched Device Type). For further investigation or to refine filters, the user can click the View in Report button within the graph. This action navigates to Reporting with a pre-generated Inventory Report, which can be further edited as needed. If required, the filtered device type can be unblocked either globally via Global Inventory Filters or for a specific SSP or Endpoint by adjusting their individual settings.
Where to Analyze Filtering Reasons for Filtered IOs:
- Reporting → Inventory Report → Filtered Opportunity Reason dimension
- Dashboard → Filtered Opportunities:
- SSP → Endpoints → Valid vs Filtered Imp. Opportunities graph
3. Matching Inventory with Demand
Once an IO passes through the initial filtration layers, the platform matches it to the most relevant Package, DSP, and profile.
- Package's Ad Type Matching: Filters IOs based on compatibility with the ad types defined in the package. IOs that do not match the selected ad types are filtered out.
- Profile Matching: Matches IOs to profiles based on the configuration of linked endpoints and targeting rules, ensuring alignment with predefined criteria. This process evaluates whether IOs satisfy targeting conditions like geographic location, device type, and audience segments specified at the profile level. IOs that do not meet these criteria are filtered out.
- Deal Matching: Matches IOs to pre-negotiated deals based on deal IDs, pricing rules, and targeting parameters. If the profile is connected to the PMP (Private Marketplace) and associated deals through the Bidder URL, the IO will be checked against the deal's targeting. Deals ensure that premium inventory and demand sources are prioritized, offering fixed or preferential pricing. IOs that fail to match deal parameters, such as price floors or targeting criteria, will not include the Deal IDs in the bid request sent to the DSP.
Example Scenario: An IO fails to match the ad type specified in the profile targeting and is filtered out. The user navigates to the relevant profile, opens the Unmatched Requests tab, selects the endpoint, and enables logging. After 10 minutes, the user accesses Reporting, selects the Unmatched Requests Report, and configures dimensions such as Date and Profile along with the Ad Opportunities metric. By applying filters for the required profile, the user generates the report to analyze missed opportunities categorized under the Unmatched Impression Type reason.
Where to See Failed Match Reason:
- Reporting → Unmatched Requests Report. Open the Unmatched Requests tab in Edit Profile. Select the desired endpoints, enable logging and wait 10 minutes for data collection. Navigate to Reporting → Unmatched Requests Report to review the results.
4. Bid Validation
On this stage, the system evaluates whether the bid meets the required criteria across multiple layers:
- Global Demand Rules: Ensures compliance with overarching rules applied to all DSPs and profiles.
- DSP/Profile-Specific Rules: Evaluates criteria configured at the DSP and profile levels as demand rules.
- SSP/Endpoint Rules: Applies SSP and endpoint-specific demand rules to validate bid eligibility.
Example Scenario: A bid is rejected because the advertiser domain is blacklisted under Profile Demand Rules. The user can investigate this by navigating to Reporting, selecting the Demand Report type, and configuring the report with the Bid Rejection Reason dimension and Rejected Bids metric. After generating the report, the user can view the number of rejected bids with the reason Unmatched Advertiser Domain. If bids from this domain should be allowed, the user can either whitelist it or remove the domain from the blacklist in the profile settings.
Resources for Troubleshooting Rejected Bids:
- Reporting → Demand Report → Bid Rejection Reason dimension
- Dashboard→ Rejected Bids graph
- Live Logs → Rejected Bid log type
5. Impression Validation
Before final delivery, the platform verifies impression data to ensure compliance with configured filters and quality standards. This process evaluates factors such as IP mismatches, expired trackers, and invalid publisher prices. Impression validation is also integrated into Events validation, where certain filters can be adjusted or disabled based on user preferences.
Example Scenario: An impression is rejected due to being identified as a duplicate. The user investigates the issue through Reporting by selecting the Inventory report type and using the Rejected Event Reason dimension. After generating the report, the user identifies the number of rejected impressions for the SSP or endpoint, along with the specific rejection reason ("Duplicate Impression"). Based on the findings, the user can adjust configurations to prevent duplicate entries.
Where to Analyze Rejected Impression Reason:
- Inventory/Demand Report → Rejected Event Reason dimension
- Live Logs → Rejected Impressions log type
Events Validation
Events validation in the RTB-Stack platform occurs at multiple stages throughout the request and bid processing workflow. Here's how and when these validations typically occur:
-
Incoming Request Validation:
- Inventory Validation: This is the first stage where the platform assesses the quality of inventory received from SSPs. It checks for issues like bid floor limits, excessive requests, and supply chain integrity. Default filters, such as "Blocked Supply Chain Participant" and "Both Site and App Objects," are applied here. Some of these filters can be deactivated by the user if they are not marked as mandatory.
-
Bid Validation:
- Once a request is matched with demand, the platform evaluates the bids received from DSPs. Bid validation checks for compliance with bid floor requirements, ad quality, and response format. Filters like "Too High Bid Price" and "Empty or Invalid Price" are applied to ensure bids meet the necessary standards.
-
Impression Validation:
- After a bid is accepted and an ad is served, the platform validates the impression to ensure it meets quality and tracking standards. This includes checking for IP mismatches, expired trackers, and invalid publisher prices. Impression validation ensures that the ad was delivered correctly and that the associated data is accurate.
User Control Over Filters
- Deactivating Filters: Some filters within the events validation process can be deactivated by the user. This allows for customization based on specific business needs or campaign requirements. However, certain default filters, especially those related to security and compliance, may be mandatory and cannot be turned off.
Example Scenario: A click event fails validation because it is associated with an impression that contains expired tracker data. The user can investigate this issue by navigating to Reporting and selecting the Inventory Report type. Under the Rejected Event Reason dimension, the user can filter by Rejected Impressions Event. Once the report is generated, it provides details on the number of rejected impressions for the specified SSP or Endpoint, along with the corresponding rejection reason (e.g., Expired Tracker).
Where to Analyze Events Validation: Users can access various sources for each corresponding stage (inventory, bid, impression validation) to analyze events validation.
Troubleshooting and Optimization Tips
- Use Live Logs: Regularly monitor logs to identify filtering issues.
- Dashboard Analysis: Leverage KPIs and tables to pinpoint gaps or inefficiencies.
- Refine Filters: Adjust global, SSP, and endpoint filters to align with your goals.
- Collaborate with Support: Contact the support team for advanced troubleshooting or configuration assistance.
This guide provides a comprehensive overview of the RTB-Stack platform's request filtration and matching logic. Use the outlined features and tools to optimize your workflows and maximize performance. For additional assistance, consult the Help Center or reach out to our support team.