Add and Configure SSP
All added Supply-Side Platforms (SSPs) are consolidated in the SSPs tab. Within this tab, you will find key statistics on Bid Performance and Impression Rate, along with quick access options for SSP editing, activation/pause, and deletion. Removed SSPs are located in a separate tab, and you can utilize the Search and AdOps Manager filter functionalities.
To access an SSP's endpoints, simply click on the desired SSP in the list.
Add an SSP
On the SSPs tab click the 'New SSP' button in the upper right corner. On the opened modal window fill in the Main Settings first, then proceed to Inventory Filters, Demand Rules and Access to Statistics.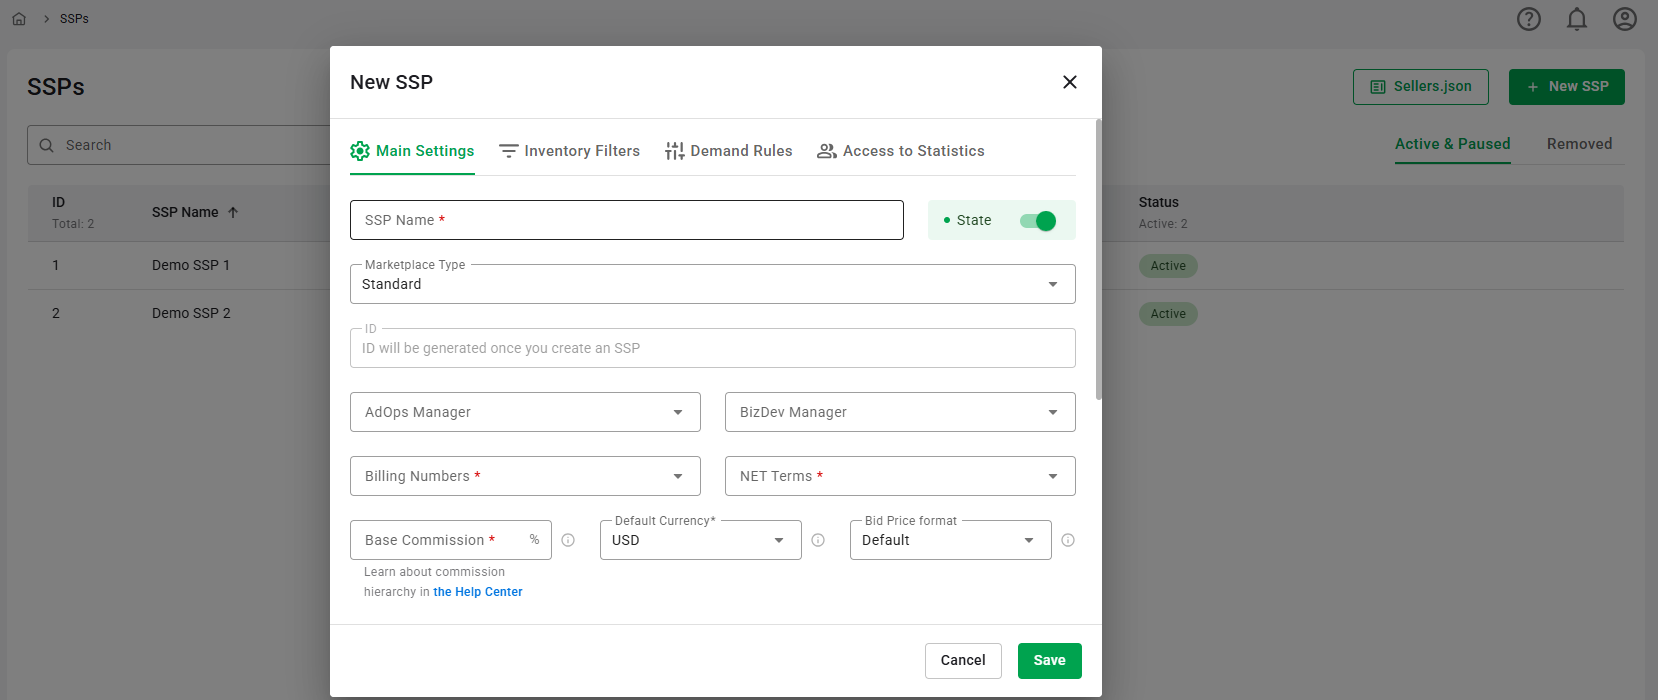
Main Settings
- Enter an SSP Name (required).
- State: This toggle indicates the state of the SSP. It can be Active or Paused.
- Choose Type: Standard.
- ID: ID will be generated once you create an SSP.
- Choose the AdOps Manager from the dropdown list. The list displays all users who hold the position of AdOps Manager. You will be able to filter statistics by the AdOps manager in the report.
- Choose the BizDev Manager from the dropdown list. The list shows all users who hold the position of BizDev Manager. You will be able to filter statistics by the BizDev manager in the report.
- Billing Numbers (required): Choose the entity responsible for billing data. Options include: [Your Account Name] (your organization), Partner.
- NET Terms (required): Select payment terms from 15, 30, 45, 60, or 90 days, specifying when payment is due post-invoice.
- Enter a Base Commission in % (required). For detailed information on RTB-Stack platform commissions and their hierarchy, please refer to the corresponding article.
- Choose the Default Currency (required). This currency is used in displaying statistics via API.
- Adjust the Supply Chain Settings:
- Enter the Domain: This field should contain the business domain name of the company that receives payment for the inventory transacted under the given seller_id. If the seller_type is set to INTERMEDIARY or BOTH, this should be the root domain of the seller's Sellers.json file.
- Set Custom Publisher ID that will be used to replace publisher.id in the request to DSP and in the Sellers.json file.
- Choose Seller Type (required): SSP, Intermediary, Both.
- Turn the Is Confidential switcher on to hide the name of this SSP in the Sellers.json file.
- Set QPS Limit for at least one of the available data centers (required). The total limit for an Ad Exchange is determined by the contract and can be changed. In case the limit is exceeded, an SSP will receive a response: "HTTP error 429: Too many requests".
- Ad size augmentation: Toggle on to enable automatic addition of related ad sizes to outgoing requests (RTB only). Read more about this feature here.
- Enter an SSP Name (required).
- State: This toggle indicates the state of the SSP. It can be Active or Paused.
- Choose Type: BidSwitch.
- BidSwitch SSP ID (required): Enter BidSwitch ID from your SSP partner.
- ID: ID will be generated once you create an SSP.
- Choose the AdOps Manager from the dropdown list. The list displays all users who hold the position of AdOps Manager. You will be able to filter statistics by the AdOps manager in the report.
- Choose the BizDev Manager from the dropdown list. The list shows all users who hold the position of BizDev Manager. You will be able to filter statistics by the BizDev manager in the report.
- Billing Numbers (required): This field is disabled as the entity responsible for billing data ([Your Account Name] or Partner) is set in the Global BidSwitch SSP Settings. To make changes, go to Platform Settings — Marketplaces — Global BidSwitch SSP Settings.
- NET Terms (required): The payment terms (15, 30, 45, 60, or 90 days) are pre-set in the Global BidSwitch SSP Settings and cannot be edited here. To adjust them, go to Platform Settings — Marketplaces — Global BidSwitch SSP Settings.
- Enter a Base Commission in % (required). For detailed information on RTB-Stack platform commissions and their hierarchy, please refer to the corresponding article.
- Choose the Default Currency (required). This field is disabled as the currency used when no currency parameter (
BidRequest.cur) is specified in the request is set in the Global BidSwitch SSP Settings. To change it, go to Platform Settings — Marketplaces — Global BidSwitch SSP Settings. - Adjust the Supply Chain Settings:
- Enter the Domain:
This field should contain the business domain name of the company that receives payment for the inventory transacted under the given
seller_id. If theseller_typeis set to INTERMEDIARY or BOTH, this should be the root domain of the seller's Sellers.json file. - Set Custom Publisher ID that will be used to replace
publisher.idin the request to DSP and in the Sellers.json file. - Choose Seller Type (required): SSP, Intermediary, Both.
- Turn the Is Confidential switcher on to hide the name of this SSP in the Sellers.json file.
After filling in all fields, remember to click the Save button or proceed to Inventory Filters.
Inventory Filters
Utilizing a range of inventory filters, you can refine the traffic that the platform processes. These filters employ various forms of logic, including boolean operations and black or white-list functionalities. With the latter, you can upload a previously prepared file for reuse across the platform.
By narrowing down incoming inventory, you can effectively avoid processing non-performing requests, thereby freeing up server capacity for high-performing inventory.
For more detailed information about each filter and its logic, refer to this page.
Demand Rules
In scenarios where certain demand should not be delivered to the SSP, demand rules must be established. These rules utilize various forms of logic, such as boolean operations and black or white-list functionalities. With the latter, you can upload a previously prepared file for reuse across the platform.
For more detailed information about each rule and its logic, refer to this page.